May 27

Farm Notes

Well friends, I’m writing this from the sunny gulf coast of Florida, where we’ve snuck away for a few days to spend time with family and to get some much needed R&R. It’s our first time off the farm for more than 48 hours all year, and we’re grateful to have great friends and neighbors keeping everything alive and tended while we’re away!

IMG_4820.jpg

It has been a wildly busy week… with the biggest harvests (thus far) of the season, while still planting (and watering and trellising and pruning…) ALL the summer veggies, AND we also officially launched our Summer CSA! We opened up signups for the Summer CSA to Farmbelly Club members on Sunday evening, and by Tuesday afternoon all of the shares were sold out, which is pretty amazing. While I’m SO grateful for all the support from our community, I’m also bummed that there are quite a few people who missed out on shares… and if that’s you, then there is still time to add your name to our waitlist, in hopes that we can open up a few more shares later this summer. If you are signed up to join the CSA, I’ll be in touch early next week with more information (the 1st pickups for the CSA start on June 15th).

Now for a few more farm-focused updates…

  • Our zucchini and cucumber plants have been growing strong over the past month, and starting next week we will start harvesting! These members of the cucurbit family are incredibly prolific once they start producing fruit, and it’s important to harvest them before the get too big. Next week I’ll show y’all the ideal sizes for zucchini and cucumbers, so you know what to look for in your home gardens.

  • This week I’ve noticed we’ve had some pest pressure from flea beetles (on our eggplant) and cucumber beetles (on our cucumbers and squash), and in case you are also struggling with these pests, I’d recommend an organic OMRI approved application called Pyganic. Pyganic is created from botanically-derived pyrethrins, which are natural pesticides found in chrysanthemum flowers. You simply dilute a few tablespoons in a 1-gallon sprayer and apply on your plants either in the morning or early evening. As an organic grower, our main method of pest control is to have healthy soil and practice good crop rotation + companion planting – but very occasionally using a few naturally-derived products like Pyganic are part of our process for maintaining healthy plants. If you have any questions about any of this, feel free to send me a message!

  • The winter squash seeds that we planted last week have (mostly) germinated and are looking good! Now’s the time to plant winter squash, and if you have any questions please let me know! Here’s a good guide on growing winter squash and some recommended varieties.

Kitchen Notes

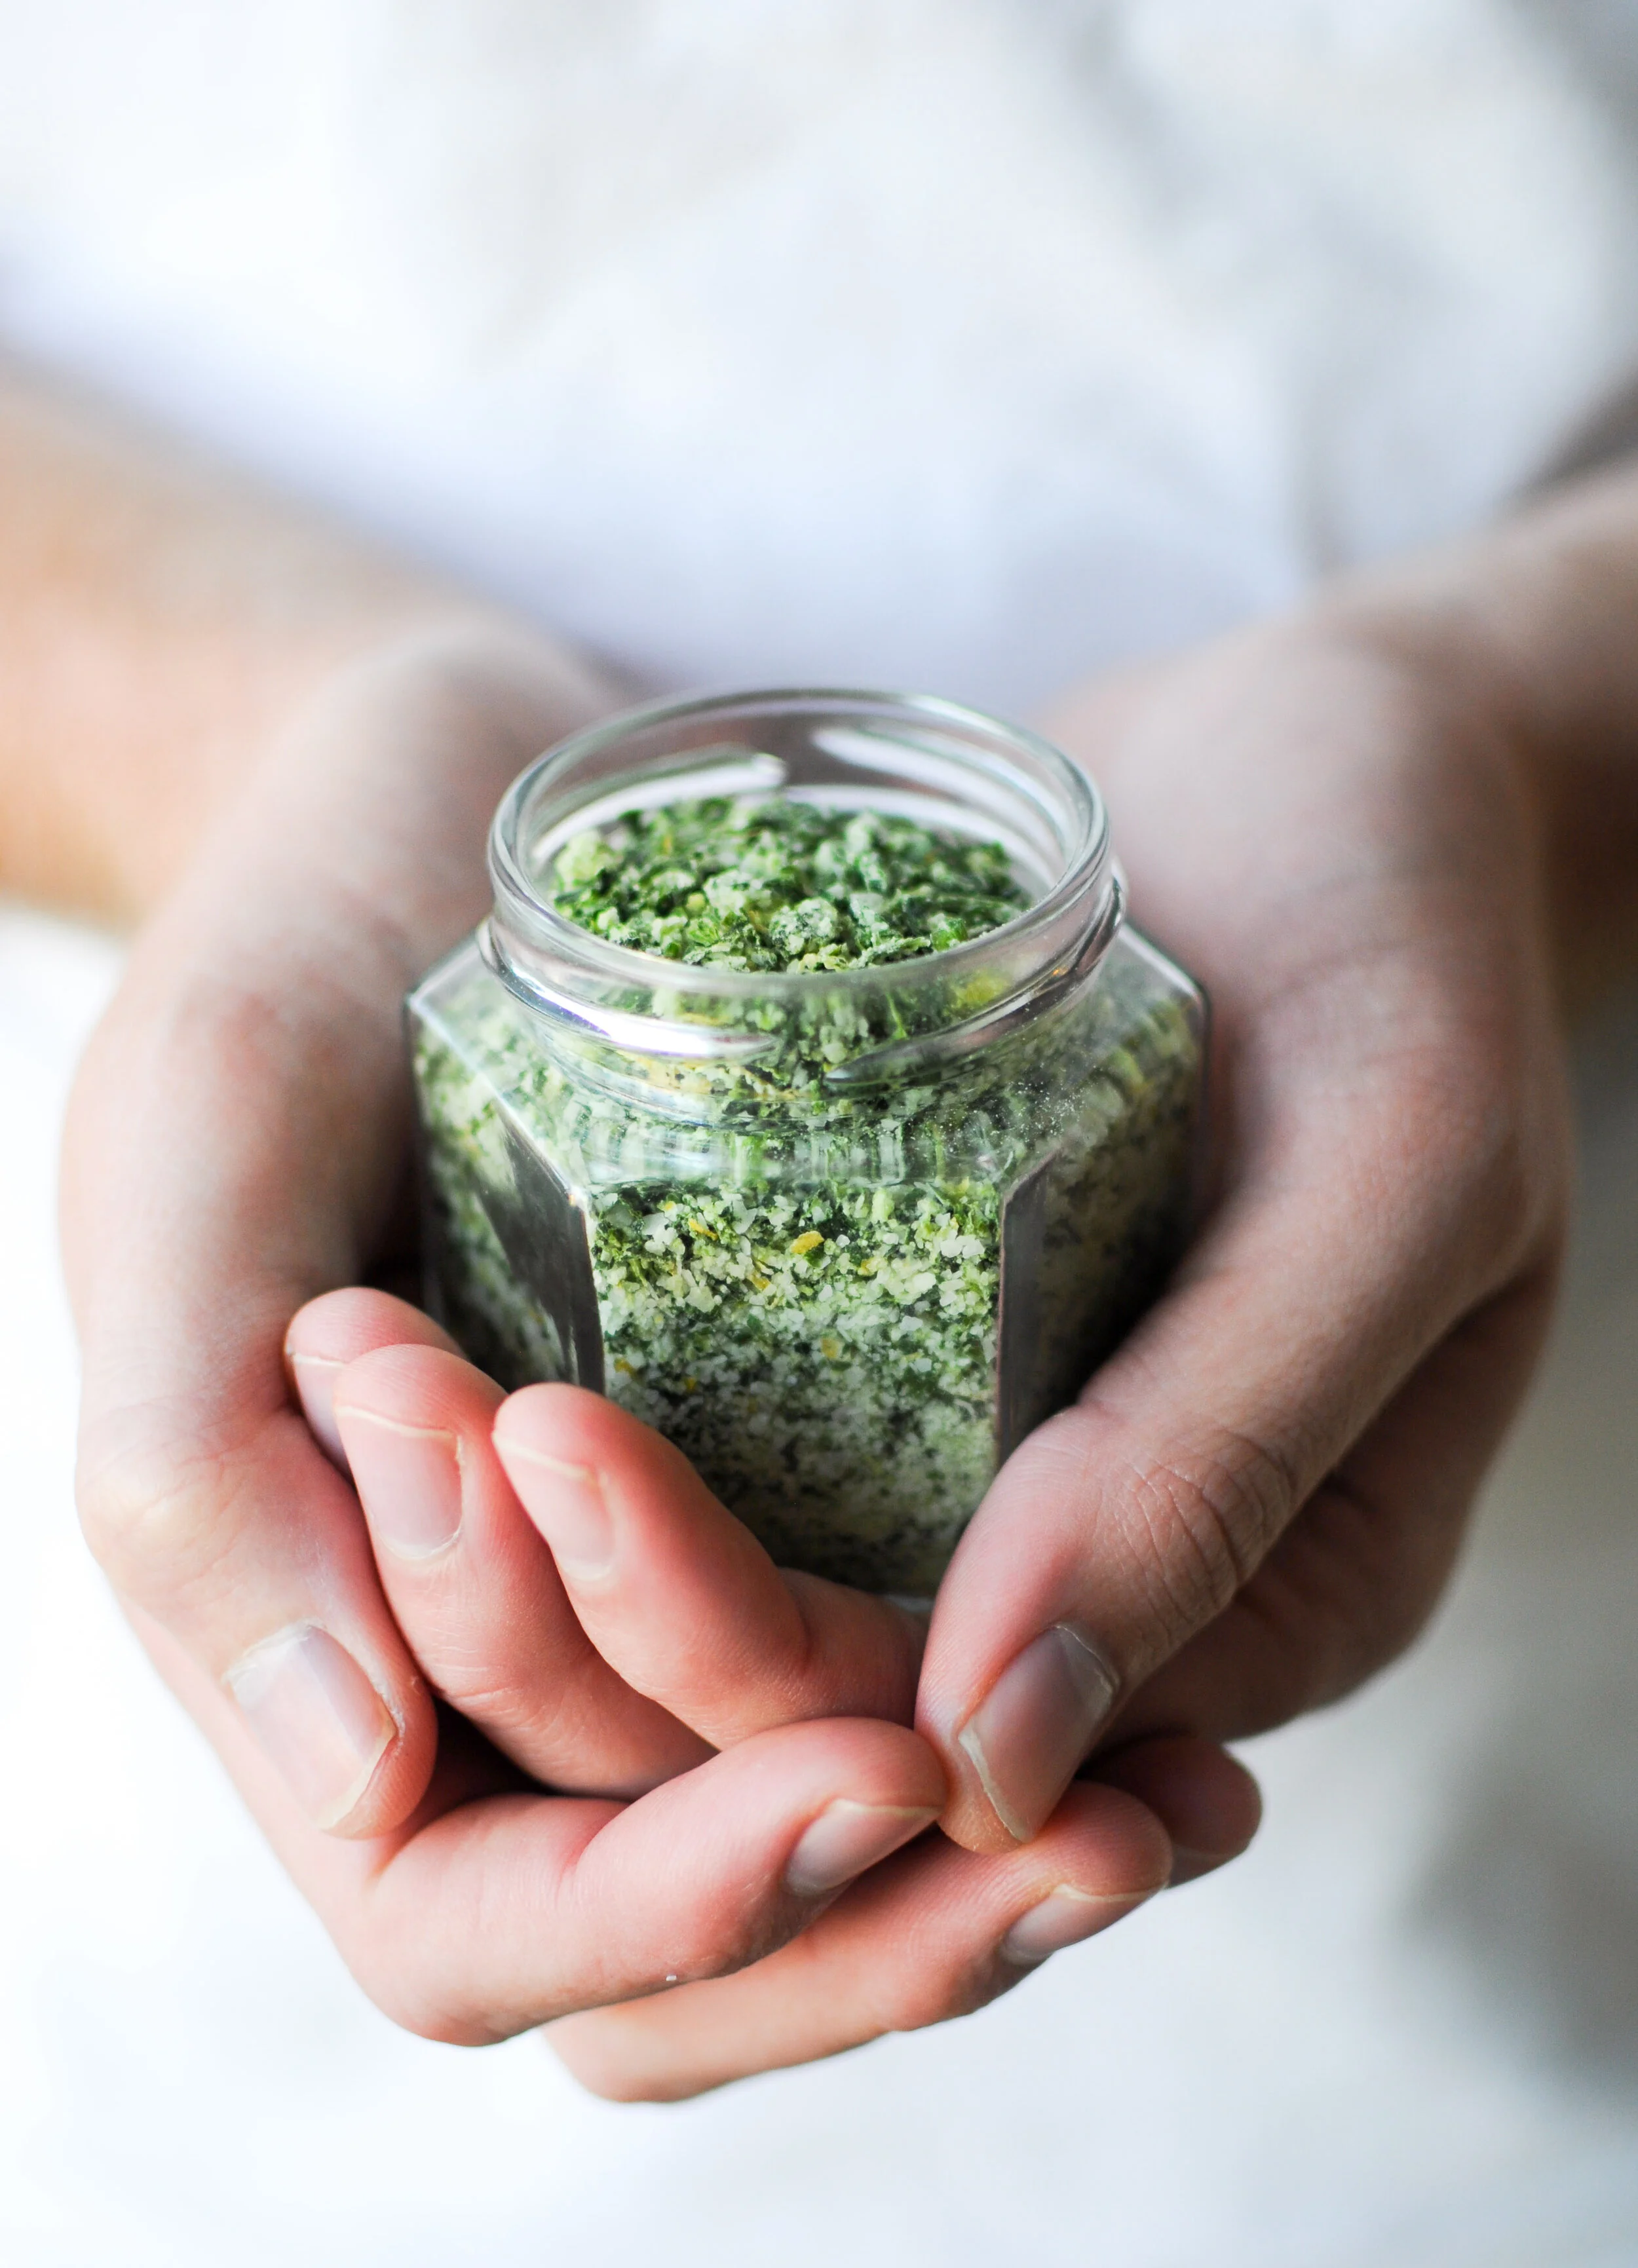
One of the things on my to-do list before we left the farm was whip up my first batch of homemade basil herb salt! I had a ton of beautiful, tender basil after pruning back our plants last week, and I wanted to make something that would be shelf-stable while we were away.

As the name suggests, herb salt is literally just fresh herbs chopped together with kosher salt (and sometimes other aromatics like lemon zest, garlic, etc) - and it's a ridiculously easy way to add vibrant, fresh flavors to your dishes. I keep my herb salts close at hand for seasoning meat, fish, and veggies - and it pairs fabulously with eggs, grilled corn on the cob, and homemade popcorn. Keep reading for the full recipe + technique for making your own herb salt, and I encourage you to get creative with the different combinations of herbs you use, and think about types of dishes that will pair well with each blend.

HERB SALT

summerherbsalt-5.jpg

INGREDIENTS

  • 1 cup packed fresh herbs

  • 1 cup kosher salt (this is my favorite brand)

  • Optional aromatics: lemon zest, fresh garlic, pepper flakes

INSTRUCTIONS

  • Preheat your oven to it’s lowest temperature (usually around 180F).

  • Combine the fresh herbs and salt (and any other aromatics, if using) in the bowl of a food processor. Whiz the herbs and salt together for a minute or two, until everything is well combined and the herbs have fully incorporated into the salt.

  • Pour the herb salt onto a rimmed baking sheet and gently dry out the mixture in your preheated oven for ~30 minutes (or until the salt feels very dry to the touch). Stir/toss the herb salt at least once while in the oven to prevent any burning.

  • Once the herb salt is dry, pour it into a clean jar and seal with a lid. It will last in your pantry for months!

Here are some of my tried and true herb salt flavor combos:

  • Fresh Summer Flavors: Basil, Chives, Dill, Lemon Zest - pair with fresh vegetables, eggs, toasted bread, and fish.

  • Classic Gremolata: Parsley, Garlic, Lemon Zest - pairs nicely with roasted asparagus, grilled salmon, and steak.

  • Savory & Rustic: Rosemary, Thyme, Sage, Garlic - pairs well with roasted root vegetables, potatoes, and roasted pork.

  • Classic French Fines Herbs: Parsley, Tarragon, Chives, Chervil - use with fish, steak, lamb, and toasted baguettes slathered in goat cheese.

  • Cilantro-Lime: Cilantro, Lime Zest, Garlic - perfect for Mexican-inspired fish or steak dishes, corn on the cob, and popcorn.

Today’s Stats

  • Low temp: 65F

  • High temp: 92F

  • Sunrise: 6:04am

  • Sunset: 8:25pm

  • Moon phase: Full moon

  • Additional notes: Hot and humid!

May 21

993AC20D-A546-458B-861A-A7EA6A85583E.JPG

Farm Notes

Happy Friday friends! It’s been a wildly busy week around here, with our biggest farmstand week yet (by far) and heaps of beautiful spring veggies headed out the door to folks in our community. It was also my birthday this week, and we celebrated by going out on our first real restaurant date in over a year! For folks who live around us in NC, we love Oakleaf in Carrboro… it’s a hidden gem with an incredible menu that changes every day, and I can attest that the chef really does source from and support local farmers.

And if you’re a farmstand customer, you hopefully received a big announcement from me yesterday that I’m excited to talk more about here… starting in mid-June, we will be transitioning away from our current farmstand model to a more traditional CSA-style farm. Why the change? The honest answer is that while I have loved our weekly farmstand where folks can place customized pre-orders each week…. the reality is that the added time and complicated back-end logistics that come with this farmstand model are not sustainable long term, especially as I start needing to slow down a bit during my pregnancy! Thankfully, everyone has been super supportive and understanding thus far, which I am incredibly grateful for. It’s exciting times around here, and I’m proud of how well everything is growing thus far, and I have a feeling this summer will be our most abundant and delicious yet.

For our local friends who might be interested in signing up (or anyone interested in how we’re organizing our CSA), you can find ALL the details about our Summer CSA right here. And some good news for Farmbelly Club members interested in becoming a CSA member… to make sure that y’all get a spot in the CSA (I have a feeling we will sell out), I’m giving Farmbelly Club members early access to sign up! As a thank you for your continued support, I will email out the link to sign up for a CSA share around 6pm on Sunday, May 23rd (regular sign-ups will open at 9am on Monday, May 24th).

Last but not least, a reminder that our next Farmbelly Club Zoom Q&A session is THIS SUNDAY, May 23rd @ 3-4pm EST! During these calls we get to hang out, get to know one another, and I'll answer any and all of your questions about growing + cooking good food. Here is the Zoom link to join, and you can submit questions ahead of time here.

Whew! That’s all I have for now. Keep reading the learn all about the art of making quick pickles…!

IMG_4781.jpg
Mixed-Vegetable-Quick-Pickles-002.jpg

Kitchen Notes

Last night I hosted another mini virtual cooking class for Farmbelly Club members, all about making quick pickles! Watch the full cooking lesson via our Facebook group here, or you can watch via our Google Drive folder here.

Quick pickles are a super easy (and delicious) way to preserve your seasonal produce, and it’s perfect for transforming any veggies that may be languishing in your fridge into something colorful, crunchy, and nourishing.

Quite simply, quick pickles are made by covering vegetables with an acidic brine, which prevents any bad bacteria from growing. Quick pickles are always stored in your refrigerator, and the cool environment in the fridge acts as a second line of defense against any bacterial growth.

The foundation of every pickling recipe is the vinegar-based brine, which usually has just four basic ingredients: 1) VINEGAR  for acidity, 2) WATER to cut the harshness of the acid, 3) SUGAR to balance the acid and 4) SALT for flavor. Once you get the basic formula down, the pickling possibilities are endless! Below is a full rundown of exactly how to make your own quick pickles:

INGREDIENTS + EQUIPMENT

  • 1 pound of fresh seasonal vegetables (such as cucumbers, carrots, cauliflower, green beans, summer squash, radishes, asparagus)

  • Optional seasonings: fresh herbs, whole spices, garlic, lemon zest, ginger, etc.

  • 2 pint-sized (or 1 quart-sized) wide mouth jars with lid

Brine Ingredients

  • 1 cup vinegar (such as white, apple cider, or rice wine) 

  • 1 cup water

  • ¼ cup sugar

  • 1 tablespoon kosher salt 

INSTRUCTIONS

  • Prepare the jar: Wash your mason jar and lid in hot soapy water, rinse and let air dry.

  • Make the pickling liquid: Combine the vinegar, water, salt, and sugar in a small saucepan over high heat. Bring to a boil, stirring to dissolve the salt and sugar. 

  • Prep the vegetables: Wash + dry the vegetables, peel (if necessary) and cut vegetables into desired shapes/sizes.

  • Pack the vegetables and flavorings: Pack the vegetables, herbs/spices/aromatics into the jars in layers, making sure there is a 1/2 inch of space from rim of the jar to the tops of the vegetables. Pack as tightly as you can without smashing.

  • Pour brine over the vegetables: Carefully fill each jar to within 1/2 inch of the top with the brine. Note: this recipe makes enough brine for 2 pint-sized jars, or 1 quart of pickles. 

  • Remove air bubbles and seal jars: Gently tap the jars against the counter to remove air bubbles. Top off with more brine if needed. Screw on lids until the rings are tight.

  • Cool and refrigerate: Let the jars cool to room temperature. Store the pickles in the refrigerator. These will taste good after 48 hours, but are much better after a couple days to a week. Keeps for at least a month – the cleaner you keep the jar, the better! 

Tried and True Quick Pickle Combinations

  • Classic Cucumber: Cucumbers, Red Onion, Peppercorns, Dill, Garlic

  • Carrot + Cauliflower: Cauliflower, Carrots, Roasted Red Pepper Flakes, Peppercorns, Garlic

  • Citrus + Fennel: Fennel, Radishes, Lemon Zest

  • Spicy Radish: Daikon radish, Red radishes, Ginger, Red Pepper Flakes

  • Okra: Okra, Red Pepper Flakes, Garlic, Peppercorns, Cumin

Today’s Stats

  • Low temp: 52F

  • High temp: 81F

  • Sunrise: 6:07am

  • Sunset: 8:21pm

  • Moon phase: Waxing Gibbous

  • Additional notes: Clear, sunny, and warm all day.

May 12

ECBB98C5-FBF6-4FA4-9B5D-87EA8035533E.JPG

FARM NOTES

Today I’m so gosh darn excited to share news that we’ve been keeping a secret since January… we’re having a baby! Holy guacamole. I’m definitely feeling all the feelings over here… SO grateful, AND tired, AND energized, AND a little/a lot overwhelmed, AND filled with so much giddy anticipation. While I don’t know if anyone ever feels “ready” to welcome a new life into the world, my husband Matthew and I feel like we’re as ready as we’ll ever be, and we are just so darn excited for this next chapter.

We know that our worlds are about to be totally rocked, and we’ll never be the same. And as a small farmer, I know that being a mom is really going to rock my world! I’m used to being able to work completely on my own schedule and to push my body to its limit doing all the weeding, planting, irrigating, harvesting, washing, packing etc that comes with this job that I love. Already I’m finding myself totally reimagining what it will look like to both a mom and a farmer, and I’m (slowly but surely) getting better about asking for help when I need it. As someone who is fiercely independent and introverted, I know that this new season is going to be a roller coaster to navigate at times. But I also know there is a new whole side of me (and of Matthew) that will emerge when this baby is born, when we will get this incredible opportunity to grow leaps and bounds as humans and parents and partners.

I know I’ll have a lot more to say on this topic in the coming weeks and months, but I’m just excited to be able to share the news with y’all today! Raising this sweet baby boy is going to take a village, and I’m wildly grateful to have such an amazing village of friends and family both near and far. :)

KITCHEN NOTES

Now that you know what I’ve been cooking up over the past 5 months, it might make a little more sense why I haven’t been in the kitchen as much recently! By some miracle, I haven’t dealt with any morning sickness during my pregnancy (which I definitely don’t take for granted), but most days, all I want to eat is a plain bagel with cream cheese, or a bowl of cereal, or a cheesy black bean quesadilla! Don’t worry, I’ve been eating HEAPS of vegetables and nourishing foods in this season, but it’s all been pretty simple and not too inspiring… so thanks for bearing with me!

But really. I’m craving quesadillas these days. And if you’re willing to get a little creative, I’ve found that quesadillas can be a great vehicle for veggies and other nourishing ingredients, nestled in between two cheesy tortillas. So today, I’m sharing links to some veggie-filled quesadilla recipes that have been getting me through the past few months!

TODAY’S STATS

  • Low temp: 40F

  • High temp: 52F

  • Sunrise: 6:14am

  • Sunset: 8:13pm

  • Moon phase: Waxing Crescent

  • Additional notes: Chilly and rainy all day.

May 9

Farm Notes

One of the topics I covered in my most recent farm walk (you can watch the video HERE) was about my must-have tools on the farm! As promised, here’s a list of my favorite tools + links to purchase:

296459B1-0357-4645-9A21-B1BED491A483.JPG

Kitchen Notes

Over the weekend, I was inspired by all our abundance of kohlrabi and fresh herbs, so I made a colorful + crunchy coleslaw that hit the spot. I’ll be honest that I was totally making it up as I went, so here’s my best stab at a recipe… coleslaw is super forgiving in my opinion, so feel free to substitute with what you have available / what feels good to you!

Herby Spring Coleslaw

IMG_4637.JPG

INGREDIENTS

  • 6-8 carrots, grated (or 1lb bag pre-shredded carrots)

  • 1/2 head red or green cabbage, finely shredded/sliced

  • 2 kohlrabi, de-stemmed, peeled, and shredded

  • 1 bunch scallions, light green and green parts sliced into thin rounds

  • 1/4 cup finely chopped dill

  • 1/4 cup finely chopped parsley

  • 1/2 cup plain greek yogurt

  • 1/4 cup mayonnaise

  • 1/4 cup tablespoons apple cider vinegar

  • 2 tablespoons olive oil

  • 2 tablespoons honey

  • Salt & pepper, to taste

INSTRUCTIONS

  1. Combine the shredded carrots, kohlrabi, cabbage, scallions, and chopped herbs in a large bowl.

  2. In a smaller bowl, whisk together the yogurt, mayonnaise, apple cider vinegar, olive oil, honey, salt and pepper. Taste and adjust seasoning to your liking.

  3. Pour the dressing over the slaw, and mix until fully coated. Best enjoyed after being chilled for a few hours before serving, to allow all the flavors to meld.

Today’s Stats

  • Low temp: 65F

  • High temp: 80F

  • Sunrise: 6:14am

  • Sunset: 8:13pm

  • Moon phase: Waning Crescent

  • Additional notes: Warm, sunny, and breezy all day.

May 7

Farm Notes

As we get deeper into the growing season, time seems to speed up and my to-do list grows longer by the day… which is why it’s been a little quieter over here! While there’s always an overwhelming amount to do this time of year, I still think that May is one of my favorite months to grow food… days are longer + warmer, but the heat + humidity of NC summers haven’t arrived, we aren’t being bitten by bugs (yet), all the plants and trees are vibrant shades of green, and there’s an abundance of gorgeous spring + early summer veggies making their way to our tables.

Yesterday we got a lot done on the farm… we started the day by fertilizing everything with fish emulsion, then pruned + continued trellising the tomatoes (which seem to be growing at lightning speed), planted heaps more peppers, eggplant, and zucchini, and tackled weeds!

Over the next few weeks we will be planting more of our late summer veggies – like corn, melons, winter squash, and sweet potatoes. I’ve actually never grown sweet potatoes before, and I’m really excited to give them a try (ps – if you’re local to central NC and want to pick up some sweet potato slips, TODAY is the last day to pre-order them from Country Farm & Home in Pittsboro… here’s the link to all their sweet potato info).

And there was a bit of a disaster with our winter squash seedlings… last weekend I seeded TONS of winter squash seeds (butternut, acorn, delicata, etc) and tucked them in our mini greenhouse setup inside our house over the weekend while we were away. When we got home and I checked on the seedlings to see if they had germinated, I discovered that a mouse had gotten into the mini greenhouse and eaten every. single. seed! I was so upset. Not only because it was a total waste of seeds, but also a waste of time spent carefully seeding each tray. Alas! I’ve decided to pivot and instead of starting our winter squash ahead and transplanting them into their beds, I’ll be direct seeding them into the ground outside in a week or two and all will be well. If you have any questions about growing winter squash, let me know and I’d be happy to help!

IMG_4603.JPG

Kitchen Notes

Let’s talk vinaigrettes! In case you missed it, yesterday I hosted a mini virtual cooking class, which was all about making homemade vinaigrettes + tips for whipping up delish salads!

Here are two ways to watch the video, and keep scrolling for ALL my tips + recipes to help you make your own flavorful and nourishing vinaigrettes at home:
1) Watch via our private Facebook page
2) Watch via the Farmbelly Club google drive folder

Okay, time for Vinaigrettes 101!

Salad dressings can be divided into two main types - vinaigrettes and creamy dressings - and both have a multitude of variations. Simply put,  a vinaigrette contains an acid (vinegar or citrus), an oil, and salt

Here are all my tips + recipe suggestions for DIY vinaigrettes:

1) Remember Your Ratio

  • The traditional formula is 3 parts oil to 1 part acid BUT 95% of the time, I lean towards more acidic dressings, and use a 2:1 ratio of oil to acid (so 2 parts oil to 1 part acid)

  • The oil is typically extra-virgin olive oil (ideally cold pressed, in a dark glass container), but you can also use grapeseed oil, sunflower oil, canola oil, etc. 

  • The acid can be either vinegar (white/red wine vinegar, apple cider, balsamic, sherry) or citrus (lemon, lime, orange) - you can also mix multiple types of acid into a single vinaigrette.

2) Balance Your Vinaigrette

To “balance” a vinaigrette means combining ingredients so they temper and complement one another, with no one aspect overpowering the whole. 

  • Salt is crucial to temper the acid while amplifying flavor.

  • Sweeteners like sugar, honey, maple syrup, and agave are optional, but help temper acidity.

  • Aromatics like spices, fresh herbs, shallots, garlic, ginger, and lemon zest add tons of flavor.

3) Emulsify + Stabilize Your Vinaigrette

Oil and acid naturally want to separate, which is why they need to be emulsified. The following kitchen staples also help oil and acid emulsify into a cohesive mixture - not to mention add great flavor!

  • Tahini - made from ground sesame seeds, pairs well with lemon, olive oil, garlic and honey.

  • Miso - Miso is a fermented soybean paste that is widely used in Japanese and Korean cuisines.

  • Mustard - lends a creamy and delightfully tangy flavor to vinaigrettes. 

TRIED & TRUE VINAIGRETTE COMBINATIONS:

  • Balsamic Vinaigrette

  • 3 tablespoons olive oil

  • 1 tablespoon balsamic vinegar

  • 1/2 teaspoon dijon mustard

  • 1/2 teaspoon honey

  • Salt & Pepper, to taste

  • Creamy Lemon-Mustard Vinaigrette

  • 3 tablespoons olive oil

  • 1  tablespoon lemon juice

  • 1 teaspoon dijon mustard

  • 1/2 teaspoon honey

  • Salt & Pepper, to taste

  • Apple Cider Vinaigrette 

    • 3 tablespoons olive oil

    • 1  tablespoon Apple Cider Vin.

    • 1 teaspoon dijon mustard

    • 1 teaspoon honey

    • Salt & Pepper, to taste

  • Tahini-Lemon Dressing

    • 2 tablespoons lemon juice

    • 2 tablespoons tahini

    • 1 tablespoon water

    • 1 teaspoon maple syrup

    • 1/4 teaspoon minced garlic

    • Salt & Pepper, to taste

Today’s Stats

  • Low temp: 42F

  • High temp: 65F

  • Sunrise: 6:18am

  • Sunset: 8:10pm

  • Moon phase: Waning Crescent

  • Additional notes: Chilly and cloudy with scattered showers.