March 18

Farm Notes

Goodness gracious, it has been a WEEK. Last Saturday I spent pretty much all day scurrying around outside in the wind (and some snow flurries) making sure all our veggie babies were covered for the extremely cold (18F!) overnight temperatures. Thankfully, when I peeked under all our row cover on Sunday morning, I found that our veggies made it through with very little damage, which I am incredibly grateful for. I know that a lot of farmers in the area weren’t so lucky, and it’s a testament to how resilient farmers have to be in order to do this work.

With the freezing temps (hopefully) behind us, throughout this week we’ve been planting like crazy! On Tuesday we got many of our brassica plants in the ground – 3 kinds of kale, broccoli and cabbage. Plants in the brassica family prefer the cooler spring weather, so we plant them now so that we’re able to harvest them in May before the summer heat arrives.

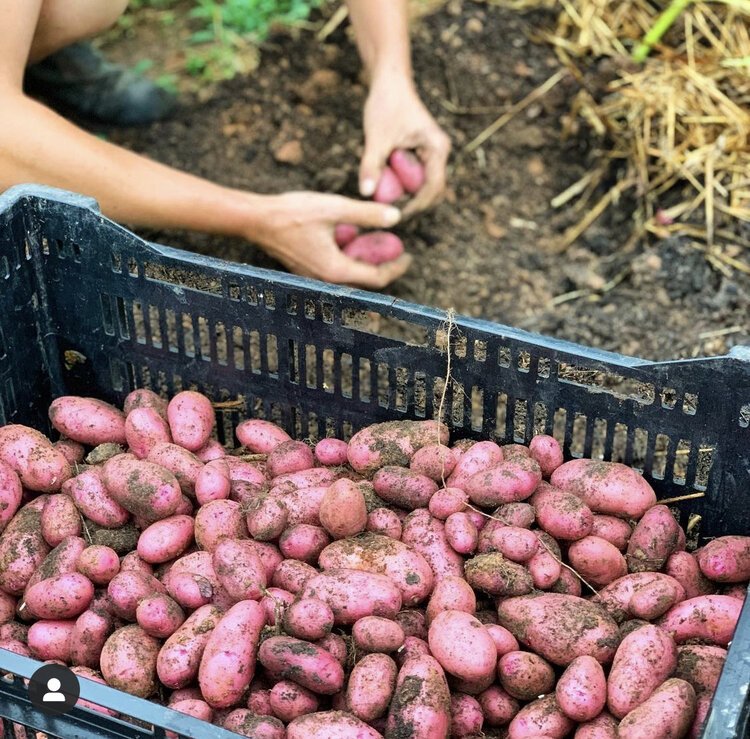
Yesterday we planted our alliums (red and yellow onions, leeks, and scallions) and our potatoes. It’s apparently good luck to plant your potatoes on St. Patrick’s Day, so hopefully our taters will be filled with good juju, and in a few months we will be rolling in delicious potatoes for all our CSA members. Potatoes are one of my favorite veggies to grow (and hands down the most fun to harvest) and now is a great time to plant them, so today I’m sharing all my tips for growing potatoes!

BEFORE YOU PLANT

1) Source your seed potatoes from a reputable local farm/garden store (for local friends, we source ours from Country Farm & Home in Pittsboro). While you technically can plant potatoes from the grocery store, your best bet is to buy seed potatoes that are specifically bred to be used to for growing potatoes (as grocery store potatoes are often treated to prevent sprouting).

2) It’s recommended to “green sprout” your seed potatoes a 1-3 weeks before you plant them, which means putting your whole seed potatoes in a box and leaving them in a warm (70-85 F) and dark place to encourage their eyes to begin sprouting. Be careful when handling to avoid breaking off sprouted eyes.

3) If your potatoes are especially large (over 4 ounces) and have lots of eyes, you can cut them into smaller pieces, which allows you to get more out of each potato. Think of the size/weight of a chicken egg as your ideal size, and try to have at least 2 eyes per seed piece. If you are going to cut your potatoes, cut them 2-3 days before you plant, to allow the cut part of the potato to heal over (to avoid the potatoes from rotting in the ground).

PLANTING YOUR POTATOES

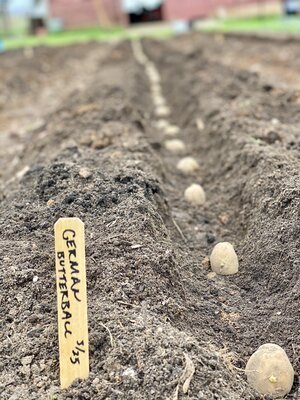
1) Prepare the soil by adding compost and any other amendments to you bed. Dig a trench in your bed about 4”-6” deep.

2) Lay seed pieces eyes pointing up in the trench spaced 8”-12” apart for standard potato varieties and 12”-18” apart for fingerling varieties.

3) Cover potatoes with a few inches of soil, leaving a bit of a trench in the bed (because over time, you’ll want to “hill” your potatoes with additional soil from the sides of your trench).

TENDING YOUR POTATOES

1) Generally, potatoes need between 1-2 inches of water per week, which can be provided by rain or you to make up the difference by watering.

2) You should “hill” your potatoes 2-3 times per season by loosening surrounding soil in the bed and pulling it up around the leaves and stems. Try to hill before the stems grow too long and start to flop over. You should pull between 2”-6” new soil up around the plants each time you hill.

HARVESTING YOUR POTATOES

1) When buying your seed potatoes, make sure to check the recommended days to harvest for each variety. Some potato varieties will be ready to harvest in 60-70 days, while others will need 90-100 days to fully mature.

2) In general, potatoes are harvested after they go to flower and once the foliage begins to die back and turn brown. I’ll cover potato harvesting in more detail when that time comes this June!

I hope this is helpful! If you have any other questions about growing potatoes, feel free to send me a message. If you are short on garden space, you can also grow potatoes in grow bags! Here’s a tutorial if you’re interested in the grow bag method.

PS – CONGRATS to Stephanie Campbell, the winner of this month’s giveaway of a Cobra gardening tool!

Kitchen Notes

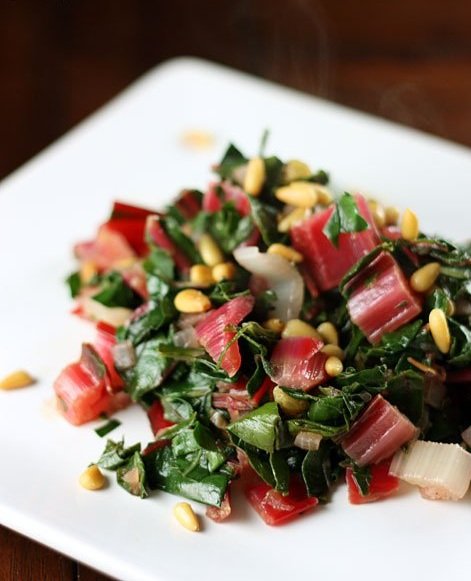
If you, like me, are constantly looking for recipes that feel and taste *special* but don’t require crazy ingredients or equipment or copious amounts of time to make – then THIS is going to be your new favorite recipe (adapted from Molly Baz’s cookbook, Cook this Book). All you do is roast a few sweet potato halves, then top it with a suuuuper simple + flavor-packed peanut-chile sauce and a little feta cheese and you’re golden. I could eat this dish as meal in itself over a bed of greens, but it also makes a great side to bring to a dinner party. Happy cooking!

Roasted Sweet Potatoes with Peanut-Chili Sauce & Feta

INGREDIENTS

  • 4 small sweet potatoes (about 2lbs total)

  • 1/2 cup plus 2 tablespoons olive oil

  • Kosher salt

  • 1/2 cup roasted, unsalted peanuts

  • 1 tablespoon honey

  • 1 teaspoon red pepper flakes

  • 1 teaspoon sweet paprika

  • 2 garlic cloves, minced

  • 2 limes

  • 4 ounces feta cheese, cut/crumbled into bite sized pieces (optional)

PREPARATION

  1. Preheat your oven to 425F.

  2. Roast the sweet potatoes: Cut the sweet potatoes in half lengthwise. Place on a rimmed baking sheet and drizzle with 2 tablespoons olive oil and season with 1.5 teaspoons salt, tossing with your hands to evenly coat. Arrange cut-sides down on your baking sheet. Transfer to the oven and roast until tender when pierced with a knife and charred on the undersides, 25-35 minutes. Transfer the roasted sweet potatoes to a platter.

  3. While the sweet potatoes roast, make the peanut-chile sauce: Roughly chop the 1/2 cup peanuts and place in a small pot and cover with 1/2 cup olive oil. Cook over medium heat, stirring often, until the peanuts are golden brown, 4-5 minutes. (A note that even after you turn off the heat, the oil will still be very hot, so if the peanuts are getting too brown, use a slotted spoon to scoop them out into a separate bowl until the oil cools a bit.)

  4. Add the honey, red pepper flakes, and paprika to the hot oil + peanut mixture and stir to combine. Allow the oil to cool for a few minutes then add the minced garlic (it will sizzle a bit, which is good.. the oil is gently cooking the garlic).

  5. Spoon the yummy peanut-chile sauce over your sweet potatoes, top with feta (if using), and a squeeze of lime. Enjoy!

Today’s Stats

  • Low temp: 59F

  • High temp: 76F

  • Sunrise: 7:23am

  • Sunset: 7:27pm

  • Moon phase: Full moon

  • Additional notes: Sunny and beautiful!

March 11

Farm Notes

In typical North Carolina fashion, we’ve been spoiled by blue skies and spring-like weather the past week or two, and now this weekend we have heaps of rain and extremelyyy cold temperatures coming our way. Saturday’s low temperature is going to be around 20F, which is COLD for mid-March! It’s especially tough for all the farmers around here, as we’ve been busy planting tender spring babies that will now need protection from the frosty temps. Last weekend I had a great crew helping me out here, and we got all our lettuces, swiss chard, kohlrabi, beets, and fennel in the ground… still to plant are all our brassicas (kale, cabbage, broccoli, etc), alliums (onions, scallions, leeks, etc), and our potatoes!

Before…

…and after!

Thankfully, I have plenty of frost cover and I will have all our veggies tucked in tight throughout the chilly weekend… but the main bummer is that in anticipation of the freezing temperatures, I’ve decided to hold off on planting the many thousands of plants that are still waiting to go in the ground. Alas! Farming is always a bit of a gamble, and I’m constantly being reminded that Mother Nature is still in charge. Speaking of frost cover - if any of you are in the same boat and have planted some veggies outside that are susceptible to freezing temps this weekend, I definitely recommend heading over to your local garden store and picking up some frost cover (something like this)!

Yesterday was cold and rainy and not terribly fun, but we toughed it out and got a big section of beds prepped and ready for planting next week. It’s this time of year that I’m especially grateful for our silage tarps, which have been hanging out on top of our beds since November/December. Today we peeled back a big area that had been tarped, and the beds look amazing (see below for a pic of when we pulled back the tarp). No weeds in sight, not too wet (even after a pretty wet winter), and super easy to prep for spring veggie babies. We source our tarps from a company called Farmers Friend, and I can’t recommend them enough!

Silage tarps working their magic!

Alright friends, let’s not let this dreary weather get us down… it’s time for another giveaway! Each month this year, I’ll be giving away some of my favorite tools for the garden and the kitchen, just as a thank you for being a part of this community. These giveaways aren’t sponsored –it really is just me wanting to share some of the tools that I find most helpful, in hopes that it will help inspire and empower you to eat like a farmer. :)

This week, I’m excited to giveaway one of my favorite garden tools… a “Cobra” weeder/planter/cultivator! I feel like this tool doesn’t get enough attention… it’s an amazing all-purpose hand tool with so many uses! It is great for getting out weeds (both small or large), making small furrows in the soil, and I also use it when transplanting seedlings into the garden.


TO ENTER THE GIVEAWAY – There are two ways that you can enter this giveaway (just choose 1):

  1. Comment on this post in our private Facebook Group and share what vegetable or fruit you are most excited to grow in your garden this year! If you aren’t already a member of our private Facebook Group, just request access here.

  2. OR Click the “Comment” button at the bottom of this journal entry and share what vegetable or fruit you are most excited to grow in your garden this year!

You have until Thursday, March 17th @ midnight to enter, and I’ll announce one randomly selected winner on Friday, March 18th. One entry per person please.

Kitchen Notes

Swiss chard is one of the first veggies we harvest in early spring, and our spring crop of swiss chard (sitting cozy in our warm tunnels) is soooo close to being ready! I’ve been looking forward to the return of swiss chard all winter long, and this super simple + flavorful recipe is one of the first dishes I plan to make. A note that you can absolutely use this same recipe with whatever greens you have on hand… kale, spinach, collards, etc will also work! Recipe adapted from Cooking Light.

SAUTÉED RAINBOW CHARD WITH GARLIC, RAISINS & PINE NUTS

Photo credit: We [Heart] Food

INGREDIENTS

  • 2 tablespoons olive oil

  • 1 yellow onion, diced

  • 2 bunches Swiss chard, stemmed and washed, stems diced and leaves coarsely chopped

  • 2 garlic cloves, minced

  • 1/4 cup raisins, rehydrated in some warm water

  • 1/4 cup pine nuts, toasted

  • 2 tablespoons white wine vinegar, plus more to taste

  • Salt and freshly ground pepper, to taste

PREPARATION

  1. Heat the olive oil over medium heat in a large, heavy nonstick skillet. Add the diced yellow onion and chard stems, a pinch of kosher salt, and cook for 3-5 minutes, until tender. 

  2. Add garlic and cook, stirring, for about 1 minute or until the garlic begins to smell fragrant (careful not to let it burn).

  3. Add the chopped greens and raisins, tossing with tongs until they are well coated with oil and beginning to wilt, 3-4 minutes. Stir in vinegar and pine nuts, tossing until well combined. Taste and season as needed with salt and pepper (and additional vinegar if desired).

Today’s Stats

  • Low temp: 50F

  • High temp: 59F

  • Sunrise: 6:33am

  • Sunset: 6:21pm

  • Moon phase: Waxing Gibbous

  • Additional notes: Partly cloudy, showers in evening

March 4

Farm Notes

This week has brought the first stretch of warm, dry, and glorious spring weather – which means we are now in full-on planting mode! Earlier this week, I learned that the thousands of spring seedlings I had ordered would be arriving a whole week early… which may not sound like a big deal, but I was planning on using these next 7 days to get all our growing beds prepped and ready for these new plant babies, so we are suddenly WAY behind schedule when it comes to bed preparation (see below for some progress made yesterday on getting some beds ready).

Alas! Yesterday we received all our beautiful seedlings for the spring season – lettuces, asian greens, swiss chard, kale, fennel, kohlrabi, onions, beets, broccoli, cabbage, etc etc – and now the next few days are going to be non-stop hustling to get these plants in the ground. I’m grateful that the weather forecast for the next few days is staying warm and dry, so it’s a great time to get these new seedlings established… even if they arrived early to the party. ;)

Prepping beds in progress…

… and beds prepped and ready for planting!

But today, I want to focus on a crop that we planted last week… asparagus! I’m excited to share more about the process of planting and growing asparagus, in case you are interested in giving it a try in your growing space. Asparagus is a perennial that takes 2-3 years to get established before you can get a proper harvest, so it’s definitely a commitment and requires some patience, but I think it is well worth the wait!

ASPARAGUS NUTS & BOLTS

  • We purchased our asparagus crowns from Nourse Farms, and the variety we chose is called ‘Millennium’ (though other common and respected varieties are Jersey Knight and Jersey Giant).

  • The best time to plant asparagus is in the winter, between mid-January and mid-March, while the plants are dormant.

  • When choosing a site for your asparagus, a few things to keep in mind:

    • Choose a sunny, well-drained site with soil that holds moisture well.

    • If possible, prepare your site a few months/weeks ahead to clear out any grass or weeds. It also helps to apply some compost to the bed a few weeks before you plant to plant.

    • Late spring frosts can kill new spears, so pick an area that is not especially low-lying or exposed to frost.

    • If the asparagus bed is to be part of a larger vegetable garden, the best place is at the north end of the space (so the tall ferns that grow in the summer/fall do not shade your other crops).

HOW TO PLANT ASPARAGUS

  • Step 1: Dig a trench – Dig a 12” wide by 8” deep trench wherever you plan to plant your asparagus crowns. Ideally the area where you plant the asparagus will already be free of grass/weeds, as asparagus doesn’t like to compete with other plants for nutrients. As the soil is removed from the trench, set it directly to the side. It will be returned to the trench as the spears grow.

  • Step 2: Apply amendments – Asparagus loves phosphorous, so it’s recommended to add organic bone meal (about 1/2lb per every 10 feet) to the bottom of your trench before planting.

Step 1: Dig trench

Step 2: Apply amendments

  • Step 3: Set your crowns – Lay crowns in the trench with the long roots running parallel with the trench (see photo below for example). Space plants so that the center “buds” of each crown are about 12” apart.

  • Step 4: Partially cover the crowns – Next, cover the crowns with 2-3 inches of the soil that was removed from the trench previously. The rest of the remaining soil will be added to the trench a few weeks later, once the spears begin to emerge above ground. As the spears grow, gradually fill in the trench with a bit more soil – within 6 weeks, the furrow should be completely filled (this method helps to limit weed development).

  • Step 5: Water – Make sure to water in the asparagus crowns well after planting, and as the asparagus grows it should receive around 1” of water per week, either by rain, hand watering, or drip irrigation. Soil moisture is important for good root and fern growth in asparagus, and they need consistent soil moisture in order to stay healthy for the next year.

Step 3: Set your crowns

Step 4: Partially cover crowns

And there you have it! Hopefully this is a helpful visual guide for planting asparagus, and I’ll be sure to keep sharing tips for overall asparagus maintenance and care as the season progresses. The main thing for the first year of growing asparagus is to keep the bed well weeded, watered, and do NOT harvest any spears in this first season so that the plants can focus on developing strong root systems. If you have any questions or need help troubleshooting, don’t hesitate to send me a message. Happy growing everyone!

Today’s Stats

  • Low temp: 40F

  • High temp: 57F

  • Sunrise: 6:41am

  • Sunset: 6:15pm

  • Moon phase: Waxing Crescent

  • Additional notes: Sunshine!